This blog covers deployment of the Red Hat Certified container for PostgreSQL on OpenShift, which is using RHEL 8.3 UBI from Red Hat. This container image provides a containerized packaging of the PostgreSQL postgres daemon. The postgres server daemon accepts connections from clients and provides access to content from PostgreSQL databases on behalf of the clients.
What are the benefits of using a certified container?
Certification brings peace of mind to our mutual customers. A solution stack that can be deployed with confidence, knowing that:
- All components come from a trusted source
- Platform packages have not been tampered with
- Container image is free of known vulnerabilities in the platform components or layers
- Container is compatible across Red Hat platforms, including OpenShift, whether on bare metal or a cloud environment
- The complete stack is commercially supported by Red Hat and our partners
Check out the entire catalog at https://catalog.redhat.com/software/containers/explore
Kustomize and Folder Organization

If you aren’t familiar with Kustomize, the folder structure gives a bit of insight on how to manage configuration differences between the services deployments depending on the environment. Kustomize itself will simply allow you to group manifests and apply them in logical groupings. However, with overlays, you can utilize the same resource groups but apply environment specific configuration depending on the overlays you choose.
While this example has a single overlay for the “dev” environment, you can add additional folders representing additional environments (qa, test, prod, etc) and change out overlay values depending on the environment.
Additionally, for this example, because we don’t have more than one environment, the overlays will be abnormally anemic.
Sealed Secrets
We are going to be deploying a database. Databases require secrets so we are going to weave in the sealed secrets story into this deployment. Sealed secrets are very powerful because they allow secrets to be stored in source control alongside the other manifests. The sealed secret is fully encrypted with the private key remaining stored in the OpenShift cluster. To get the sealed secretes controller installed on OpenShift, we need to apply the following manifests. Notice the patch, which makes it more secure and OpenShift friendly.
https://github.com/orepio/ops-cluster/tree/main/sealed-secrets
apiVersion: v1
kind: Namespace
metadata:
  name: sealed-secrets

---

apiVersion: kustomize.config.k8s.io/v1beta1
kind: Kustomization
namespace: sealed-secrets
commonLabels:
  app: sealed-secrets
resources:
- namespace.yaml
# Downloaded from: https://github.com/bitnami-labs/sealed-secrets/releases/download/v0.15.0/controller.yaml
- controller.yaml

patchesJson6902:
- target:
    group: apps
    version: v1
    kind: Deployment
    name: sealed-secrets-controller
  path: sc-patch.yaml

---

# sc-patch.yaml
- op: remove
  path: /spec/template/spec/containers/0/securityContext/runAsUser
- op: remove
  path: /spec/template/spec/securityContext/fsGroup
The Account Database Manifests
The deployment of a database was actually part of another project, where I am developing a fully reactive Quarkus application for a REST API. I want to deploy this application to an OpenShift cluster and therefore, I need a PostgreSQL database to support the account API. Here’s the github for the application operations repository with the account db components: https://github.com/orepio/ops-applications/tree/main/account-db
DEV Overlay
For the sake of this blog post, our dev overlay is very simple and only references the base resources folder.
bases:
  - ../../resources
Resources Kustomization
The kustomization.yaml file in the resources folder groups all of our manifests together for the database.
namespace: account-db
resources:
  - namespace.yaml
  - sealedsecret.yaml
  - configmap.yaml
  - statefulset.yaml
  - service.yaml
The Namespace
apiVersion: v1
kind: Namespace
metadata:
  name: account-db
  labels:
    app: account-db
    app-type: database
The Sealed Secret
apiVersion: bitnami.com/v1alpha1
kind: SealedSecret
metadata:
  creationTimestamp: null
  name: account-db-secret
  namespace: account-db
  labels:
    app: account-db
    app-type: database
spec:
  encryptedData:
    database_password: AgAO2HhJ73Q7GVIxP2B+tCWWIAe/J08aVlMhXmF+4YhJJKgkWkERlENKMW4gjvMWJRRlaw4UBDtMpvZdaU8thogjmuiV26q+beE3SJHDhhSUdVKtVNbjI7q3SzXXckAeDSn8dM9vR2ZMkaR0A6i2LIVv6vpt0VRxiQi12n2ul8euLOAix5yjjwiH/Y6aRCHd9HV77Lcqjh5z70rbWrwTPLnEkbGzpR3j+NzRbn0Q3P+nv9InwA+KpGgEYsKFUA+UBPCEtmF/ddlHL4Rnn/QmcQv9rUzKzDroDYD+5bSUDnlbSDLdnoVtyyEsjE82uv0l711GJhziEtDrIJTg0LTAMM3bgCZomzFR2Qtxsu69XqiFvONYboYq05w8hprUtS/b2bbK7C96rEII3V+mKG0w5ibIu22bUiNLBIeYQp6x665+p03Xlf2o5v9uG+hC+9gzSUQ7w+Cd97xi/oioFiRcgiXh+FKIhkO8RL9c64hmy9IWtlqCVdojWHgIDE6P4X93kUH+n+AHRxZDZkt7iKyMlPd1l/tl4+moyCeRK5mmYcdD5VAPbslIopAh9ULM5INKAkfzA9U6SM9v+BaU0kAfIsOGJnQxqhs/1NWcSehOPGFmmcFqrEjFL+zKGoxRNbPSeDulqLEP9rt07woeIxgr+SmhfrP9o1FCX7nM1qJjxNEYJpOhKK6qYJ3nXP4jZdn8+SDeuinzoqKu+w0I
  template:
    metadata:
      creationTimestamp: null
      name: account-db-secret
      namespace: account-db
      labels:
        app: account-db
        app-type: database
Wait? How’d I get this? And that’s not a base64 encoded value. That’s encrypted. It’s encrypted to the point where I would be totally comfortable publishing it out to a public git repo. The way sealed secrets work is when this manifest is applied to a cluster, the sealed secrets controller has an admission hook that recognized the type, decrypts the value and converts it to a regular secret. Here’s what it looks like live in a cluster.
kind: Secret
apiVersion: v1
metadata:
  selfLink: /api/v1/namespaces/account-db/secrets/account-db-secret
  resourceVersion: '76164643'
  name: account-db-secret
  uid: cfaf1c9c-e0fa-4aa6-a8ba-0d8652e0287d
  creationTimestamp: '2021-04-09T15:41:44Z'
  namespace: account-db
  ownerReferences:
    - apiVersion: bitnami.com/v1alpha1
      kind: SealedSecret
      name: account-db-secret
      uid: ff5f6909-e408-495c-aea6-ff11761a768b
      controller: true
  labels:
    app: account-db
    app-type: database
data:
  database_password: ############# <-- base64 encoded value
type: Opaque
To initially create the sealed secret, you need the kubeseal cli installed. Here’s the command that creates the secret, then pipes it to kubeseal which then sends it to the cluster to be encrypted and the resulting file is returned. I can store that in my gitops repo.
oc create secret generic account-db-secret \
    --from-literal=database_password=<password> \
    --dry-run=client \
    -o yaml \
    | \
kubeseal \
    --controller-namespace sealed-secrets \
    --namespace account-db \
    -o yaml \
    --scope strict \
    > resources/sealedsecret.yaml
Side Note: If you want to use sealed secrets with emphemeral clusters, after installing the sealed secrets controller, get a copy of the private key used to do all the encryption and then you can use the same key in a different cluster. There’s also some stories around key rotation, but that’s for another post.
The ConfigMap, StatefulSet and Service
apiVersion: v1
kind: ConfigMap
metadata:
  name: account-db-configmap
  labels:
    app: account-db
    app-type: database
data:
  database_name: account_db
  database_user: account-db-user
apiVersion: apps/v1
kind: StatefulSet
metadata:
name: account-db-statefulset
labels:
app: account-db
app-type: database
spec:
serviceName: account-db-service
replicas: 3
selector:
matchLabels:
run: account-db
template:
metadata:
labels:
run: account-db
spec:
containers:
- name: postgres
image: registry.redhat.io/rhel8/postgresql-12
env:
- name: POSTGRESQL_DATABASE
valueFrom:
configMapKeyRef:
name: account-db-configmap
key: database_name
- name: POSTGRESQL_USER
valueFrom:
configMapKeyRef:
name: account-db-configmap
key: database_user
- name: POSTGRESQL_PASSWORD
valueFrom:
secretKeyRef:
name: account-db-secret
key: database_password
ports:
- containerPort: 5432
volumeMounts:
- name: account-db-volumeclaim
mountPath: /var/lib/pgsql/data
volumeClaimTemplates:
- metadata:
name: account-db-volumeclaim
spec:
accessModes: [ "ReadWriteOnce" ]
storageClassName: standard
resources:
requests:
storage: 3GiapiVersion: v1
kind: Service
metadata:
name: account-db-service
labels:
app: account-db
app-type: database
spec:
ports:
- port: 5432
selector:
run: account-dbApply the Manifests
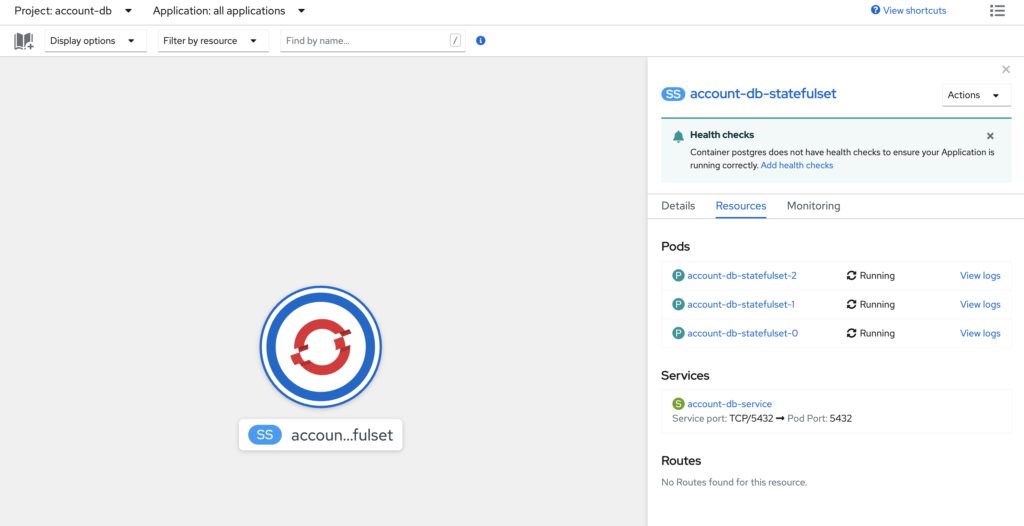
Once this is setup, apply the manifests and you are up and running.
oc apply -k ops-applications/account-db/overlays/dev