Prerequisites:
- OpenShift Cluster installed
- OpenShift Data Foundation with Multicloud Object Gateway installed
- OpenShift Virtualization installed
The OpenShift API for Data Protection (OADP) is a powerful extension of the OpenShift ecosystem designed to enhance data resilience and disaster recovery for Kubernetes workloads. OADP provides a standardized approach to backup, restore, and migration by integrating with popular data protection tools like Velero and incorporating cloud-native principles. This API abstracts complex backup operations, allowing users to safeguard both stateless and stateful applications running on OpenShift, including resources like KubeVirt virtual machines. With its flexible configuration and robust support for storage snapshots, OADP empowers administrators to implement comprehensive data protection strategies across hybrid and multi-cloud environments, ensuring critical application data is preserved and easily recoverable in the event of failures.
Install the OADP Operator
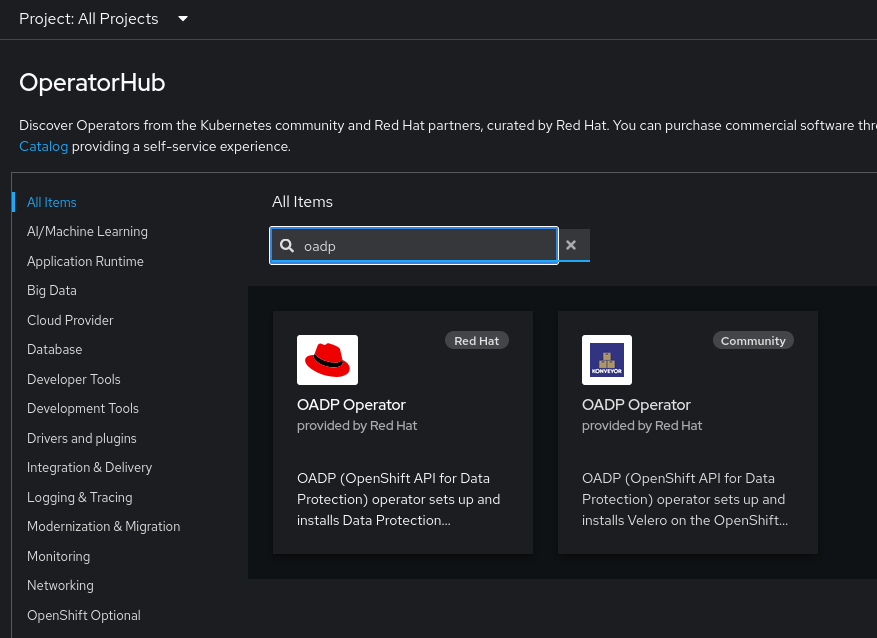
- Go to the OpenShift console, click on Operators -> OperatorHub on the left menu bar, search for “oadp”, click on OADP operator
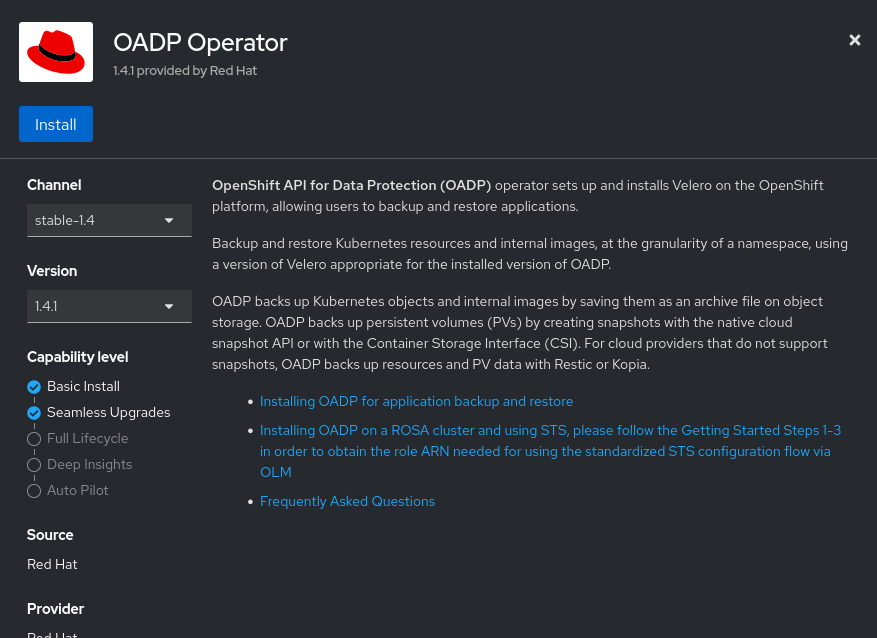
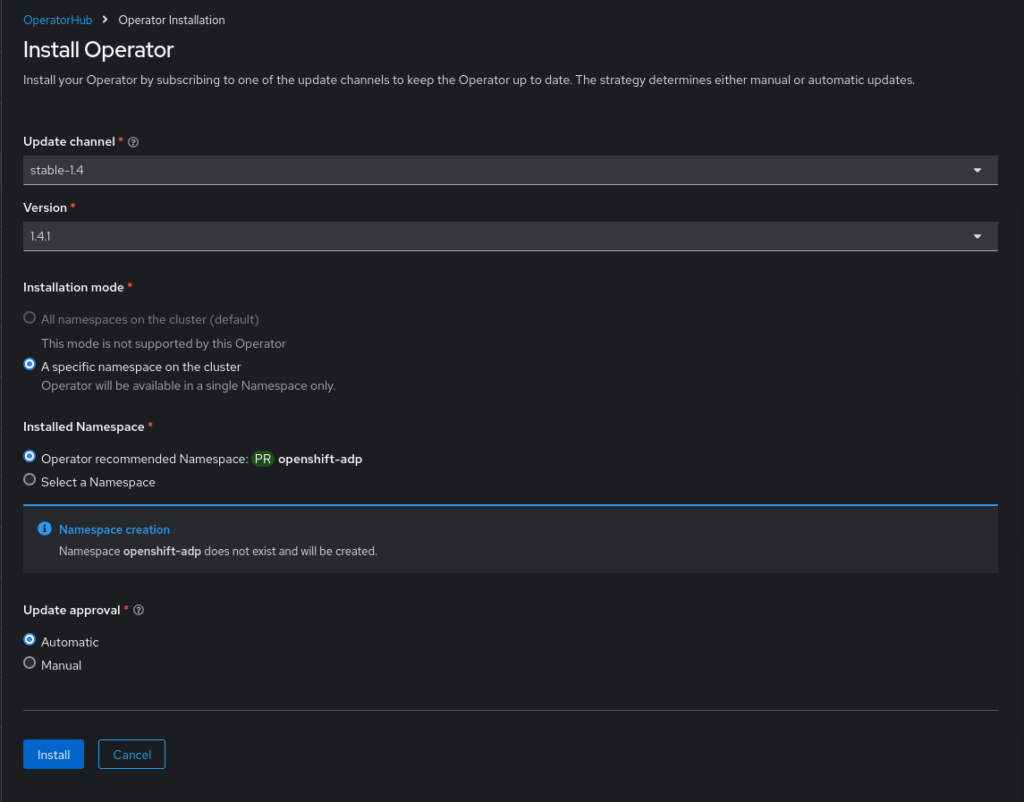
- Click Install
- And one more time…
- Wait for it…
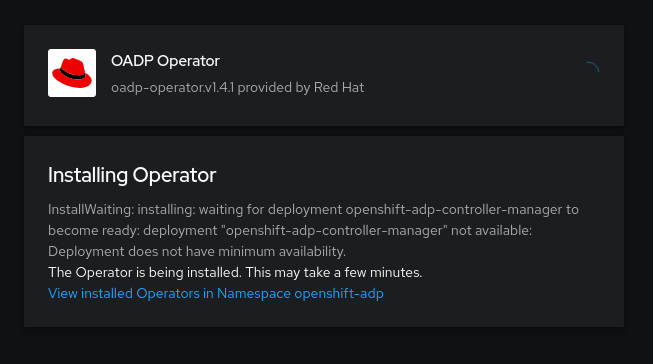
- And you are done.

After the install is complete, you can setup an alias to use the velero cli directly in the cluster.
alias velero='oc -n openshift-adp exec deployment/velero -c velero -it -- ./velero'Create the ObjectBucketClaim for the Backup
ObjectBucketClaims (OBCs) are a Kubernetes-native way to dynamically provision and manage object storage, making them a valuable tool for implementing backup solutions. When used with OpenShift’s data protection frameworks, OBCs enable the seamless integration of S3-compatible storage to store backup data. By creating an OBC, users can define their storage requirements, which automatically generates an associated bucket in the configured object storage backend. This abstraction simplifies storage management and eliminates the need for manual bucket creation, allowing backup solutions to easily write snapshots, application data, and virtual machine images to an OBC-managed bucket. With this approach, backups can be centralized, scalable, and compatible with hybrid cloud architectures, providing a flexible and efficient way to manage backup storage across diverse environments.
apiVersion: objectbucket.io/v1alpha1
kind: ObjectBucketClaim
metadata:
  name: vm-backups
  namespace: openshift-adp
spec:
  generateBucketName: vm-backups
  storageClassName: openshift-storage.noobaa.io
  additionalConfig:
    bucketclass: "noobaa-default-bucket-class"
The proceeding yaml snippet will create the ObjectBucketClaim and the subsequent ObjectBucket for your backup location. It will also create a Secret and a ConfigMap containing the necessary information for the configuration of the DataProtectionApplication custom resource. We need to create the cloud-credentials secret for the DataProtectionApplication that contains the following values.
oc extract secret/vm-backups -n openshift-adp --keys=AWS_ACCESS_KEY_ID --to=-
oc extract secret/vm-backups -n openshift-adp --keys=AWS_SECRET_ACCESS_KEY --to=-
Then take those values and create a new file called credentials-velero with the following format.
[default]
aws_access_key_id=<AWS_ACCESS_KEY_ID>
aws_secret_access_key=<AWS_SECRET_ACCESS_KEY>
After creating the file, generate the default secret for use in the DataProtectionApplication configuration with the following command.
oc create secret generic cloud-credentials -n openshift-adp --from-file cloud=credentials-veleroCreate the DataProtectionApplication
Now that we have the configuration in place, we need to create the actual custom resource. In addition to the secret created earlier, we will also need the name of the just-created bucket as well as it’s service address for the configuration. You can retrieve these values from the ConfigMap.
oc get configmap vm-backups -n openshift-adp -o jsonpath='{.data.BUCKET_NAME}{"\n"}'
oc get configmap vm-backups -n openshift-adp -o jsonpath='{.data.BUCKET_HOST}{"\n"}'
Now we can create the DPA.
apiVersion: oadp.openshift.io/v1alpha1
kind: DataProtectionApplication
metadata:
  name: oadp-dpa
  namespace: openshift-adp
spec:
  configuration:
    nodeAgent:
      enable: true
      uploaderType: kopia
    velero:
      featureFlags:
        - EnableCSI
      defaultPlugins:
        - aws
        - csi
        - kubevirt
        - openshift
      resourceTimeout: 10m
  backupLocations:
    - velero:
        default: true
        provider: aws
        config:
          profile: default
          region: "local-odf"
          s3ForcePathStyle: "true"
          s3Url: http://<BUCKET_HOST>:443
          insecureSkipTLSVerify: "true"
        credential:
          name: cloud-credentials
          key: cloud
        objectStorage:
          bucket: "<BUCKET_NAME>"
          prefix: vm-backups
We will need all four of the plugins listed in the configuration: kubevirt handles the VMs, openshift handled the OCP specific components, csi handles the PVCs and the aws plugin is used for accessing the bucket storage. Check to see that everything is running.
snimmo@fedora oadp % oc get all -n openshift-adp

NAME                                                   READY   STATUS    RESTARTS   AGE
pod/node-agent-cnm24                                   1/1     Running   0          18s
pod/node-agent-dd88s                                   1/1     Running   0          18s
pod/node-agent-rmgjf                                   1/1     Running   0          18s
pod/openshift-adp-controller-manager-8d86b9dc6-8m7lf   1/1     Running   0          29m
pod/velero-b9dc56d54-t64x2                             1/1     Running   0          18s

NAME                                                       TYPE        CLUSTER-IP       EXTERNAL-IP   PORT(S)    AGE
service/openshift-adp-controller-manager-metrics-service   ClusterIP   172.30.196.128   <none>        8443/TCP   29m
service/openshift-adp-velero-metrics-svc                   ClusterIP   172.30.58.123    <none>        8085/TCP   18s

NAME                        DESIRED   CURRENT   READY   UP-TO-DATE   AVAILABLE   NODE SELECTOR   AGE
daemonset.apps/node-agent   3         3         3       3            3           <none>          18s

NAME                                               READY   UP-TO-DATE   AVAILABLE   AGE
deployment.apps/openshift-adp-controller-manager   1/1     1            1           29m
deployment.apps/velero                             1/1     1            1           19s

NAME                                                         DESIRED   CURRENT   READY   AGE
replicaset.apps/openshift-adp-controller-manager-8d86b9dc6   1         1         1       29m
replicaset.apps/velero-b9dc56d54                             1         1         1       19s
Create a Virtual Machine
Now we will create a virtual machine. Create the new project and apply the following YAML to your cluster.
oc new-project test-vmsapiVersion: kubevirt.io/v1
kind: VirtualMachine
metadata:
name: test-rhel-9
namespace: test-vms
labels:
vm: test-rhel-9
spec:
dataVolumeTemplates:
- metadata:
name: test-rhel-9-rhel9-image
labels:
vm: test-rhel-9
spec:
sourceRef:
kind: DataSource
name: rhel9
namespace: openshift-virtualization-os-images
storage:
resources:
requests:
storage: 30Gi
- metadata:
name: test-rhel-9-extra-disk
labels:
vm: test-rhel-9
spec:
preallocation: false
source:
blank: {}
storage:
resources:
requests:
storage: 5Gi
storageClassName: ocs-storagecluster-ceph-rbd
running: true
template:
metadata:
labels:
kubevirt.io/domain: test-rhel-9
vm: test-rhel-9
spec:
domain:
cpu:
cores: 1
sockets: 2
threads: 1
devices:
disks:
- name: rootdisk
disk:
bus: virtio
- name: cloudinitdisk
disk:
bus: virtio
- name: extra-disk
disk:
bus: virtio
interfaces:
- masquerade: {}
name: default
rng: {}
features:
smm:
enabled: true
firmware:
bootloader:
efi: {}
resources:
requests:
memory: 4Gi
evictionStrategy: LiveMigrate
networks:
- name: default
pod: {}
volumes:
- name: rootdisk
dataVolume:
name: test-rhel-9-rhel9-image
- name: cloudinitdisk
cloudInitNoCloud:
userData: |-
#cloud-config
user: cloud-user
password: 'Pass123!'
chpasswd: { expire: False }
runcmd:
- mkfs.ext4 /dev/vdc
- mkdir -p /mnt/extra-disk
- mount /dev/vdc /mnt/extra-disk
- bash -c "echo '/dev/vdc /mnt/extra-disk ext4 defaults 0 0' >> /etc/fstab"
- sudo chmod 777 /mnt/extra-disk
- sudo chcon -R -t svirt_sandbox_file_t /mnt/extra-disk
- date -Iseconds > /mnt/extra-disk/timestamp.txt
- name: extra-disk
dataVolume:
name: test-rhel-9-extra-diskNotice the label vm: test-rhel-9 being used to label not only the VM components, but also the storage. In this backup scenario, we want to isolate the backup to only be scoped to the single VM, not the entire namespace. This is useful in situations where you have multiple VMs in the same namespace and want the power to restore independently.
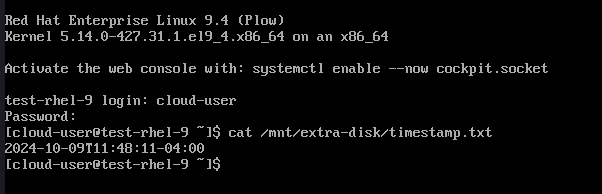
After the VM starts up, you can login and check the value of the timestamp generated in the file at /mnt/extra-disk/timestamp.txt. We will be adding a second file to that disk as part of demonstrating the restore process
Backup, Delete and Restore
Now that we have a running VM in out test-vms project, we need to create a backup.
apiVersion: velero.io/v1
kind: Backup
metadata:
  name: test-rhel-9-backup
  namespace: openshift-adp
  labels:
    velero.io/storage-location: default
spec:
  includeClusterResources: false
  includedNamespaces:
    - test-vms
  labelSelector:
    matchExpressions:
      - key: vm
        operator: In
        values: [test-rhel-9]
  ttl: 168h0m0s
Notice the label selector. We just want to backup the VM, not the namespace. Once this is applied, you can check the status of the backup using the velero cli. You can also check it in the console as well.
velero backup describe test-rhel-9-backupIf something goes wrong, you can check the logs using the following command.
velero backup logs test-rhel-9-backup | grep failWe have a healthy backup. Let’s go add another timestamp file in the VM.
date -Iseconds > /mnt/extra-disk/timestamp2.txtNow let’s “accidentally” delete the VM and the namespace.
oc delete virtualmachine/test-rhel-9 -n test-vms
oc delete project test-vms
Uh oh. Not a problem. Let’s run the restore.
apiVersion: velero.io/v1
kind: Restore
metadata:
  name: restore-test-rhel-9-backup
  namespace: openshift-adp
spec:
  backupName: test-rhel-9-backup
You can also run the restore using the cli.
velero restore create --from-backup test-rhel-9-backupAfter the restore executes, the OpenShift project and the VMs are reinstated.
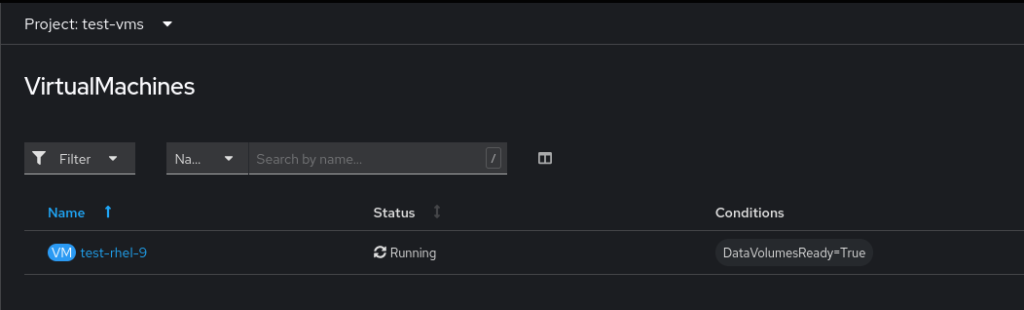
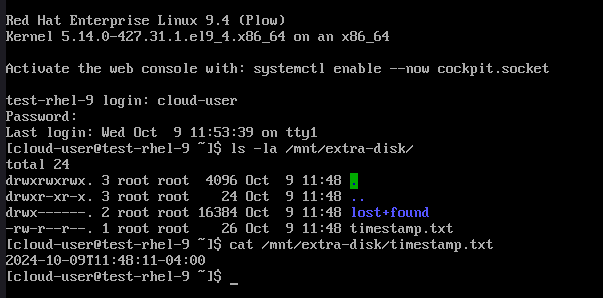
And in the VM, we can go check that the extra disk was mounted with the backup.
Conclusion
In this blog post, we demonstrate how to effectively back up and restore a single VM using OpenShift Virtualization and the OpenShift API for Data Protection (OADP). This post guides readers through setting up the OADP Operator, creating ObjectBucketClaims for storage, configuring DataProtectionApplication, and executing the backup and restore process. It emphasizes using Velero and the OADP components to achieve reliable data protection for KubeVirt VMs. This approach ensures that VMs and their associated data can be safely restored in case of failure or accidental deletion.
References
https://docs.openshift.com/container-platform/4.16/backup_and_restore/index.html
https://docs.openshift.com/container-platform/4.16/virt/about_virt/about-virt.html
One comment
Comments are closed.