Python’s popularity continues to grow. While it’s best known as a scripting language, the language has evolved to handle many use cases with machine learning and data management being the best known use case. One of those use cases is building REST APIs.
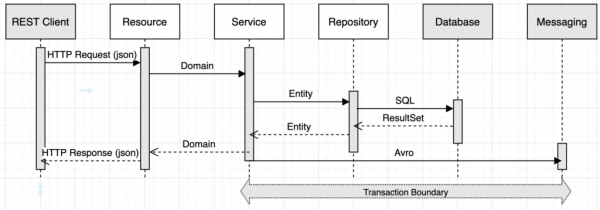
I am a Java developer and have written about building REST APIs in the past, mostly using Quarkus, which heavily utilizes the Microprofile specification. One of the more popular articles was an in-depth walkthrough of how to build a REST API “from the ground up”, where we build a simple REST API but explain all the architecture layers and the implementation details of those layers.
Many of my customers are starting to really invest in Python development capabilities in their organization. As a experiment, I have worked on reimplementing the exact same project using Python. In this blog post, we will review the implementation, discuss some of the details and caveats to effective Python development, as well as identify both feature gaps and advantages between the two ecosystems.
This blog was written for development on a Mac. If you are doing things on a Windows box, you will need to adjust some of the commands.
Project Source: https://github.com/stephennimmo/python-ground-up
Project initialization
To begin, we will need to talk about Python development environments. While developers can use an existing, centralized Python interpreter in their local environment, the best practice has led to the use of virtual environments, where every project has it’s own, isolated Python interpreter with the specific packages installed. These stateful environments are a different requirement in terms of management from the Java ecosystem because in Java, the “packages” are dependencies and are loaded at runtime so there is no need for the separate environments.
Python virtual environment (venv) management has undergone quite a bit of evolution over the last few years and there are quite a few tools out there to manage things. For this project, we are going to use Poetry for our packaging and dependency management. Poetry has a nice CLI for managing dependencies and takes advantage of the pyproject.toml configuration specification which is what I consider to be the best practice for new Python projects.
Get started by installing Poetry in your local environment. Once that’s installed, we will want to change one of the global configurations for Poetry that specifies for virtual environments to be managed within each project, rather than in the default cache location by poetry. To update the configuration, use the following command.
poetry config virtualenvs.in-project trueWith Poetry installed and configured, we will create a new project. Run the following commands.
poetry new python-ground-up
cd python-ground-up
poetry install
curl https://raw.githubusercontent.com/github/gitignore/main/Python.gitignore > .gitignore
touch .env
git init
git add --all
git commit -m 'project init'
After completing these commands, the project should have the following structure.
├── .git
├── .venv
├── python_ground_up
│   └── __init__.py
└── tests
    └── __init__.py
├── .gitignore
├── poetry.lock
├── pyproject.toml
├── README.md
The pyproject.toml should also be initialized in the following manner.
[tool.poetry]
name = "python-ground-up"
version = "0.1.0"
description = ""
authors = ["snimmo <stephennimmo@gmail.com>"]
readme = "README.md"

[tool.poetry.dependencies]
python = "^3.11"


[build-system]
requires = ["poetry-core"]
build-backend = "poetry.core.masonry.api"
Side Note
As a Java developer who works almost exclusively in the Maven ecosystem, the world of Python development can be scary as the subject of code organization is very subjective. There are no global defaults such as the “src/main/java” standards in the Maven ecosystem. Moving from project to project, you will notice a wide variety of naming conventions, folder structures and standards. It’s just the way things are in the Python world as there are few, if any, globally accepted standards. I have included some additional references at the end of the blog where you can get some more opinions on the subject.
Repository Layer
Now that the project is setup, you should import it into your favorite IDE. Once that is done, open a console to get to the command line. On the command line, run the command poetry shell to setup your local .venv as the Python interpreter to use for the rest of the poetry commands.
In the previous article, it was named “from the ground up” because we started at the database layer and went up. For this article, we will do the same thing. We will need to gather some packages that will replicate the functionality we had in the other project, namely an ORM and a schema versioning system. In the Python world, the most popular ORM is SQLAlchemy, which is equivalent to the Hibernate framework in Java. For schema versioning, we will be using Alembic, which heavily utilizes SQLAlchemy. We are going to add these packages using Poetry, along with the Postgresql database adapter and a utility package for data validation.
poetry add alembic sqlalchemy_utils psycopg2-binary
alembic init migrations
alembic revision -m 'create customer table' --rev-id=1
One of the neat things about Python development is that when you install some packages in your venv, it automatically makes it available as a first-class CLI library. You’ll notice that after adding Alembic, we immediately ran a couple of Alembic CLI commands.
The second command, alembic init migrations, initializes the Alembic migration environment and configuration and places them in a folder at the project root named “migrations”, instead of putting it in a default “alembic” folder. The third command creates our first revision to be used to create the database.
More on Alembic
You will notice that we specified the revision id in the command to create the revision. When using Flyway, the database revisions are SQL based and they use the file names and semantic versioning rules to manage the revisions. In Alembic, the revisions are hardcoded for each one in the revision’s python file. If you do not specify the rev-id, Alembic will generate one for you and it’s ugly – 99a5ddb49633_message.py. One of the things you’ll notice is if you use the default generation system, your revision files will get out of sequential order and will be a nightmare to walk through. One set of best practices recommends updating the alembic.ini file to use a date-based file structure but I personally think that just using an incremented integer value will provide the file ordering needed to keep things tidy.
Let’s update the migration script to create the Customer table exactly like the one we used previously.
"""create customer table

Revision ID: 1
Revises:
Create Date: 2023-08-31 05:03:52.234848

"""
from typing import Sequence, Union

from alembic import op
import sqlalchemy as sa


# revision identifiers, used by Alembic.
revision: str = '1'
down_revision: Union[str, None] = None
branch_labels: Union[str, Sequence[str], None] = None
depends_on: Union[str, Sequence[str], None] = None


def upgrade() -> None:
    op.create_table(
        'customer',
        sa.Column('customer_id', sa.Integer, primary_key=True),
        sa.Column('first_name', sa.Text, nullable=False),
        sa.Column('middle_name', sa.Text),
        sa.Column('last_name', sa.Text, nullable=False),
        sa.Column('suffix', sa.Text),
        sa.Column('email', sa.Text, nullable=False, unique=True),
        sa.Column('phone', sa.Text)
    )


def downgrade() -> None:
    op.drop_table('customer')
One of the things you should notice is that the script uses SQLAlchemy to generate the table, instead of using SQL directly. This is just a choice as you could theoretically use SQL directly using the op.execute function. This creates the following table structure.
create table public.customer
(
    customer_id serial       primary key,
    first_name  text         not null,
    middle_name text,
    last_name   text         not null,
    suffix      text,
    email       varchar(255) not null unique,
    phone       text
);
alter table public.customer owner to postgres;
Side Quest: Setup Pydantic Settings
Our next step is to get the Alembic environment ready to perform migrations. One of the necessary things is to get the database URI configured for the environment. For application settings, we will want to use Pydantic’s settings package which will provide a clearly-defined, type-hinted application configuration class. Let’s add the package using Poetry.
poetry add pydantic_settingsNow, let’s add a new python file and populate it with the environment settings that will be needed for database connectivity.
from pydantic_settings import BaseSettings, SettingsConfigDict


class Settings(BaseSettings):

    db_driver: str = "postgresql"
    db_username: str
    db_password: str
    db_hostname: str
    db_port: int
    db_name: str
    db_echo: bool = False
    db_pool_size: int = 5
    db_max_overflow: int = 0

    @property
    def db_uri(self) -> str:
        return f"{self.db_driver}://{self.db_username}:{self.db_password}@{self.db_hostname}:{self.db_port}/{self.db_name}"

    model_config = SettingsConfigDict(env_file=".env")


settings = Settings()
Alembic Migration Configuration
Now that the settings are configured, we will need to go update the Alembic configuration to use the db_uri provided by our settings.py. This is detailed in Alembic’s configuration documentation. We will import the settings object from python_ground_up.settings and setup the config.
...
from python_ground_up.settings import settings
...
config.set_main_option('sqlalchemy.url', settings.db_uri)
...
Remember at the beginning of the project, we created a .env file. That’s used for local environment variable configuration. Populate the file with the following values.
DB_USERNAME=postgres
DB_PASSWORD=postgres
DB_HOSTNAME=localhost
DB_PORT=5432
DB_NAME=customer
We are going to be using Podman compose to manage our containerized PostgreSQL instance. Create a new compose.yaml file and paste in the following.
version: '3.8'

services:
  database:
    image: postgres:15
    ports:
      - "5432:5432"
    environment:
      - POSTGRES_USER=postgres
      - POSTGRES_PASSWORD=postgres
      - POSTGRES_DB=customer
Side Quest: Setup Poe the Poet
One of the gaps between the Java/Maven world and the Python world is the lack of standardization around the lifecycle commands. Using Maven, I am very used to using the mvn command line to do things like testing, compilation, packaging, deploying, etc. In the Python world, all of these concepts (besides compiling) exist, however their implementation is highly bespoke from project to project with a lot of copy and paste boilerplate code.
However, there is where Poe the Poet comes in. It’s a task runner that works well with Poetry. It gives you the ability to setup tasks, similar to the Maven tasks, to help with those things you do all the time. Let’s add that package.
poetry add -D poethepoetFor our development, let setup some tasks for the things we are going to do. I usually add all the tool.poe items at the very bottom of the pyproject.toml file.
...
[tool.poe]
envfile = ".env"

[tool.poe.tasks]
run = "uvicorn python_ground_up.main:app --reload"
test = "pytest -v"
migrate = "alembic upgrade head"
compose-up = "podman-compose -f compose.yaml up -d"
compose-down = "podman-compose -f compose.yaml down"
Poe gives you the ability to use that .env file and to setup the environment variables prior to executing any of the tasks. This is super handy to eliminate boilerplate environment setup code.
Let’s migrate! Run the following commands. Reminder, that you should be in the shell created by the poetry shell command. The poe CLI runs the tasks by name. We are going to spin up a the compose environment with a running PostgreSQL instance and then run the migrate task, which runs the Alembic migrate command.
poe compose-up
poe migrate
At this point, you should be able to connect to the running database and see the initialized table structures.
Database Infrastructure
To build the SQLAlchemy ORM components, we will need a common database.py script that sets up the engine, the sessionmaker and declares the Base class that we will use in the models. Along with that, the Fastapi package has it’s own, built-in dependency injection framework and we want to go ahead and create a generator to be used to create SQLAlchemy sessions.
from sqlalchemy import create_engine
from sqlalchemy.orm import sessionmaker, DeclarativeBase

from python_ground_up.settings import settings

engine = create_engine(settings.db_uri)
SessionLocal = sessionmaker(autocommit=False, autoflush=False, bind=engine)


class Base(DeclarativeBase):
    pass


def get_session():
    session = SessionLocal()
    try:
        yield session
    finally:
        session.close()
Customer API Features
Now that the plumbing is complete, let’s start building the actual customer API feature. We are going to build the API using FastAPI, which seems to be the best framework for building highly performant APIs but isn’t bloated with everything that Flask does. At first glance, FastAPI seems to do a bunch of things, but it’s really a thin shim on top of some other technology, namely starlette and pydantic. Sure, FastAPI makes things a lot simpler and has some great value add but the bulk of the features are provided by the other projects.
Again the project structure definitions are highly subjective and there are lot of opinions out there. For our customer domain, we are going to just create a python package called “customer” and put all the customer-related source code in there. This thinking is influenced by the FastAPI documentation on “Bigger Applications – Multiple Files”. Let’s create the folder and add the packages.
mkdir python_ground_up/customer
poetry add fastapi "uvicorn[standard]" "pydantic[email]"
We added fastapi, which includes a whole slew of other packages including starlette and pydantic. We also added uvicorn, which is an ASGI web server implementation for Python. Unlike in the Java world where we just start up the server directly, the ASGI is the guts of the threading and process model that manages the pools responding to requests. The ASGI calls back to the FastAPI router definitions and will do so using async/await if the endpoints are configured that way. For our implementation, we will just be implementing using normal, synchronous blocking calls but the ASGI is still needed.
Repository Layer
One of the main differences between Python and Java is around code organization. In Java, there is no concept of just a function – everything is a method in a class. Additionally, every class is a separate file (with the exception of Inner classes and such) so to find a class, the file name is a good indicator. And the file naming patterns exist to quickly understand what type of class the file might contain based on the suffix – Entity, Service, Repository, Endpoint, etc.
In Python, you have the ability to follow this same pattern but I rarely see any project examples which follow this construct. While most well-organized projects contain fairly descriptive files names, there is no rhyme or reason to what’s in the actual files. Some project are organized where a single file at a higher level, such as models.py, might contain all of the ORM models for the entire project while some others break out the model classes into separate files in different subpackages in a project. Long story short, this lack of standardization can cause developers some initial headaches when they are context switching across projects because of the variety of bespoke code organization patterns.
For our purposes, we are going to use a simple naming structure with 5 file naming patterns – repository, model, service, schema, and api. To get us started, let’s create the SQLAlchemy model class for the customer table.
from sqlalchemy import Column, Integer, Text

from python_ground_up.database import Base


class CustomerBase(Base):

    __tablename__ = "customer"

    customer_id = Column('customer_id', Integer, primary_key=True)
    first_name = Column('first_name', Text, nullable=False)
    middle_name = Column('middle_name', Text)
    last_name = Column('last_name', Text, nullable=False)
    suffix = Column('suffix', Text)
    email = Column('email', Text, nullable=False, unique=True)
    phone = Column('phone', Text)
Notice that I created this class with the suffix of ‘Base’. We will end up with a Pydantic schema which also represents a customer. I like to standardize on class names with well-known suffixes to differentiate them, especially in the service class where we are going to be using both the ORM class and the Pydantic class. Now that we have our base class, let’s create a CustomerRepository class to encapsulate the database access.
from typing import Type
from sqlalchemy.orm import Session

from python_ground_up.customer.models import CustomerBase


class CustomerRepository:

    def find_all(self, session: Session) -> list[Type[CustomerBase]]:
        return session.query(CustomerBase).all()

    def find_by_id(self, session: Session, customer_id: int) -> CustomerBase | None:
        return session.query(CustomerBase.customer_id).filter(CustomerBase.customer_id == customer_id).scalar()

    def find_by_email(self, session: Session, email: str) -> CustomerBase | None:
        return session.query(CustomerBase).filter(CustomerBase.email == email).scalar()

    def create(self, session: Session, customer_base: CustomerBase) -> CustomerBase:
        session.add(customer_base)
        session.commit()
        session.refresh(customer_base)
        return customer_base

    def update(self, session: Session, customer_base: CustomerBase) -> CustomerBase:
        customer = self.find_by_id(session, customer_base.customer_id)
        customer.first_name = customer_base.first_name
        customer.middle_name = customer_base.middle_name
        customer.last_name = customer_base.last_name
        customer.suffix = customer_base.suffix
        customer.email = customer_base.email
        customer.phone = customer_base.phone
        session.commit()
        return customer_base
Now that we have the CRUD functionality, we can build out our service class. However prior to bulding the service class, we will need to create the schema class that will represent the external data structure exposed to the API consumer. For this, we will be using Pydantic.
from pydantic import BaseModel, ConfigDict, EmailStr


class Customer(BaseModel):
    customer_id: int | None = None
    first_name: str
    middle_name: str | None = None
    last_name: str
    suffix: str | None = None
    email: EmailStr
    phone: str | None = None

    model_config = ConfigDict(from_attributes=True)
The Pydantic class is going to provide two very powerful features. First, it provides field validations such as format and required characteristics. This also works very well with doing the data conversions between the ORM object and the Pydantic object, by including the model_config with the from_attributes set to True.
Now that we have the schema, let’s build out the service class.
from sqlalchemy.orm import Session
from python_ground_up.customer.repository import CustomerRepository, CustomerBase
from python_ground_up.customer.schema import Customer


class CustomerService:

    def __init__(self):
        self._customer_repository = CustomerRepository()

    def find_all(self, session: Session) -> list[Customer]:
        customers = self._customer_repository.find_all(session)
        return [Customer.model_validate(customer) for customer in customers]

    def find_by_id(self, session: Session, customer_id: int) -> Customer | None:
        customer_base = self._customer_repository.find_by_id(session, customer_id)
        return Customer.model_validate(customer_base) if customer_base else None

    def find_by_email(self, session: Session, email: str) -> Customer | None:
        customer_base = self._customer_repository.find_by_email(session, email)
        return Customer.model_validate(customer_base) if customer_base else None

    def create(self, session: Session, customer: Customer) -> Customer:
        customer_base = CustomerBase(first_name=customer.first_name, middle_name=customer.middle_name,
                                   last_name=customer.last_name, suffix=customer.suffix, email=customer.email,
                                   phone=customer.phone)
        customer_base = self._customer_repository.create(session, customer_base)
        return Customer.model_validate(customer_base)

    def update(self, session: Session, customer: Customer) -> Customer:
        customer_base = CustomerBase(customer_id=customer.customer_id, first_name=customer.first_name, middle_name=customer.middle_name, last_name=customer.last_name,
                                   suffix=customer.suffix, email=customer.email, phone=customer.phone)
        customer_base = self._customer_repository.update(session, customer_base)
        return Customer.model_validate(customer_base)
Now that we have the service class, we can finish up with building out the api functionality. One of the quirks here is that the FastAPI framework doesn’t support class-based implementations. It’s build out using functions to define the API endpoints.
from fastapi import APIRouter, Depends, HTTPException, status
from fastapi.encoders import jsonable_encoder
from fastapi.responses import JSONResponse
from sqlalchemy.orm import Session

from python_ground_up.database import get_session
from python_ground_up.customer.schema import Customer
from python_ground_up.customer.service import CustomerService

router = APIRouter(tags=["customer"])
customer_service = CustomerService()


@router.get("/customers", response_model=list[Customer])
def get(session: Session = Depends(get_session)) -> list[Customer]:
    return customer_service.find_all(session)


@router.get("/customers/{customer_id}", response_model=Customer)
def get_by_id(customer_id: int, session: Session = Depends(get_session)) -> Customer:
    customer = customer_service.find_by_id(session, customer_id)
    if customer is None:
        raise HTTPException(status_code=404, detail=f"Customer not found for customer_id[{customer_id}]")
    return customer


@router.post("/customers", response_model=Customer)
def create(customer: Customer, session: Session = Depends(get_session)) -> JSONResponse:
    if customer.customer_id is not None:
        raise HTTPException(status_code=400, detail=f"Customer object cannot contain customer_id[{customer.customer_id}]")
    existing_customer = customer_service.find_by_email(session, customer.email)
    if existing_customer is not None:
        raise HTTPException(status_code=400, detail=f"Customer already exists for email[{customer.email}]")
    new_customer = customer_service.create(session, customer)
    return JSONResponse(status_code=status.HTTP_201_CREATED, content=jsonable_encoder(new_customer))
Notice we are splitting out and isolating the customer api endpoint functions into a separate file. This is following the pattern as documented in the FastAPI documentation around building larger applications.
That leaves us with the last piece which is the main.py where we setup and integrate the FastAPI application itself.
from fastapi import FastAPI

from python_ground_up.customer.api import router as customer_api

app = FastAPI(title='Customer API', version='0.0.1', separate_input_output_schemas=False)

app.include_router(customer_api, prefix="/v1")
Testing
One of the suprising pieces was the ease of use around testing the FastAPI application. FastAPI includes a TestClient, which takes the FastAPI app object as an argument, which gives you a really robust HTTP client for testing. We will want to get started by adding the test packages using Poetry.
poetry add -D pytest httpxNow that we have the packages, we can create a single test client that can be used throughout the test classes.
from fastapi.testclient import TestClient

from python_ground_up.main import app

test_client = TestClient(app)
Here’s an example implementation of some http tests around the customer api.
import random
import string

from fastapi import status

from python_ground_up.customer.schemas import Customer
from tests.client import test_client


class TestCustomerApi:

    def test_get_customers(self):
        response = test_client.get("/v1/customers")
        assert response.status_code == status.HTTP_200_OK

    def test_create_customer(self):
        response = test_client.post("/v1/customers", json=self.new_customer().model_dump())
        assert response.status_code == status.HTTP_201_CREATED
        assert response.json()["customer_id"] >= 0

    def new_customer(self) -> Customer:
        return Customer(
            first_name=''.join(random.choices(string.ascii_letters, k=10)),
            last_name=''.join(random.choices(string.ascii_letters, k=10)),
            email=f"{''.join(random.choices(string.ascii_letters, k=10))}@gmail.com"
        )
Conclusions
The FastAPI framework provides some really neat functionality out of the box. It will automatically generate not only the OpenAPI specification and swagger documentation, but it also can create the Redoc for the project as well. It seems to perform very well when combined with the uvicorn package and the testing framework is easy to manage. If you are building REST APIs in Python, then FastAPI is the way to go.
References
https://github.com/stephennimmo/python-ground-up
https://github.com/zhanymkanov/fastapi-best-practices
https://christophergs.com/tutorials/ultimate-fastapi-tutorial-pt-1-hello-world