When I came to Red Hat, I had mostly lived in the IT world. My servers were in data centers. The smallest box I had to deal with were usually my poorly equipped local desktop. We had build processes and deployment pipelines. Bandwidth was never a concern other than having a major hardware meltdown. We kept things up to date and if a change needed to be made, we were patching maybe dozens of machines. Rolling out new versions of the code eventually became a weekly or daily occurrence, as needed.
I was then introduced to the OT. The operational technology space was a different world. There’s PLCs and RIOs. There’s DCSs and SCADA systems. Software installs were usually done by a chemical engineer who happens to understand computers or a PHD in process engineering. It’s priorities were different and rightly so. Changing things at the edge is different. The scale is different as the device counts for a deployment target could easily be in the 1000s. The mere act of getting a new version of a piece of software in some cases might require a helicopter or boat ride. The implications of change were much higher. A software bug in a financial system in the cloud might cost you some money but a software bug at the edge could cost someone their life. Change is not considered a good thing in the OT – it’s a risk.
Understanding Modbus
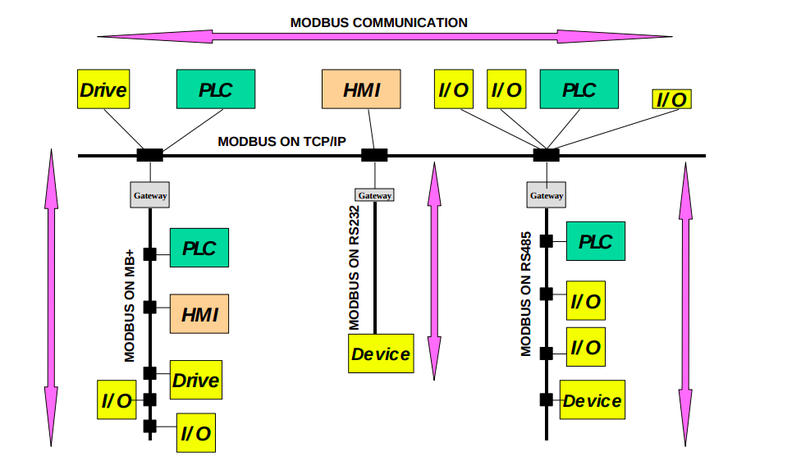
Modbus is a messaging structure developed by Modicon in 1979, used to establish client-server communication between intelligent devices. The term “intelligent devices” is a bit of a wide-open phrase but if the clue of “made in 1979” doesn’t provide some context, the protocol is designed to work within very constrained compute environments. Modbus is a very simple request-response protocol originally designed for communication to devices connected with actual serial cables (e.g. RS485, RS232). Since it’s inception, it has grown to support additional types of physical device communication, such as ethernet, however the overall behavior of the protocol remains the same. The big takeaway is to understand that this protocol is designed to be an interface between the electronic and physical world. The data values represented in the protocol most likely correspond to real world physical things such as motors, pumps, pressure gauges, thermometers or vibration sensors.
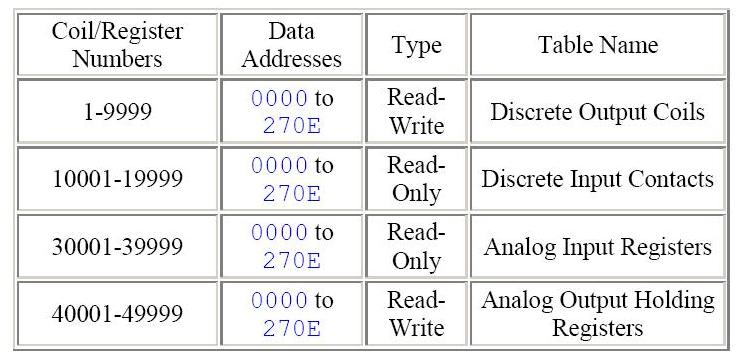
The protocol is a request-response, where the device plays the role of a server and will respond to requests coming from clients. The request targets some very low level data structures defined in the modbus protocol as registers and coils. A register is a 16-bit structure while a coil represents 1 bit and they are addressable by their number. Some of the registers and coils are defined as “input” and some are “output”, while others can be whatever the manufacturer decided them to be. The protocol defines each request with a function code which describes what the request should do, whether it’s to read a particular coil/register or to write to that coil/register.

This information, combined with the understanding that this protocol is designed to interact with the physical world, should give some clues as to what the data might represent. An input coil could be used to start or stop a pump while an output coil could be used to denote if the pump is actually running or not. A input register might hold a desired speed of a motor while an output register could hold it’s actual current speed.
What makes modbus difficult is it’s variety. Much like many other communication protocols, the how is well-defined in terms of communication, but the payloads are the wild west. Every manufacturer can create their coils and register structures in a bespoke manner. One manufacturer of thermometers might store the temperature in register 54 while another one might store it in 254. The functionality of the devices also vary widely. To add to this variety is a lack of human-readable naming structures. Remember, these devices are very compute constrained so storing a huge set of text tags to describe a register or coil wasn’t a highly desired feature at the time. So for every device, someone will need to identify the numbers associated with the I/O elements and have some external mapping process if these data points are going to be pulled into a SCADA system or DCS.
Containers at the Edge
At the edge, things need to work. There is very little room for error especially around critical processes. Prior to containers, applications running on an edge device would require a lot of care and concern because of not only noisy neighbor problems, but how things like server or runtime patching by one team might inadvertently impact another team’s application. There is also the problem of heterogeneous environments where an application needs to run on multiple flavors of linux with differing packages. For some legacy OT environments, the scale of differentiation is unknown.
This is where containers shine. Developers can now deploy their entire application, including it’s dependencies, in a single package that can be run on any OCI-compliant container runtime with confidence that it will not only work as expected, but it will not accidentally harm other running processes. Containers also allow a more wide variety of technical skillsets at the edge. Because containers hide any of the details regarding language, you can hire developers with Java, Node, and .NET skillsets to work on OT applications rather than only Python or C++ developers.
Let’s Build a Modbus Client Using Quarkus
To build our Quarkus-based Modbus client, we are going to get started by using the fancy new Quarkus CLI. For this exercise, we are not going to be doing anything really complicated. We just want to demonstrate how to connect to modbus using Quarkus and then build a nice, tidy container for deployment at the edge.
Let’s create the project and then open it in your favorite IDE.
quarkus create app com.stephennimmo.modbus:quarkus-modbus-client --extension='netty'To connect to a modbus server, we are going to need a modbus library to help us as we do not want to write it all from scratch. For this, we are going to use SolarNetwork’s nifty-modbus libraries. The documentation is pretty good and it seems to be written using modern Java libraries such as Netty. We are going to be connecting to the modbus server via TCP. Let’s open the project’s pom and add the two jars we are going to need for this project.
...
<dependency>
    <groupId>net.solarnetwork.common</groupId>
    <artifactId>nifty-modbus-core</artifactId>
    <version>0.4.0</version>
</dependency>
<dependency>
    <groupId>net.solarnetwork.common</groupId>
    <artifactId>nifty-modbus-tcp</artifactId>
    <version>0.4.0</version>
</dependency>
...
Polling Commence
As described earlier, modbus is a request-response protocol which requires the client to send a request to either read or write a value, either to a coil or register. If there a need to observe a value that is changing rapidly, then requests will need to be sent at the same rate as the response is needed. For example, if you need a temperature every minute, then a request will need to be sent every minute. If you need the RPM of a motor every 10ms, then a request will need to be sent every 10ms. Most of the time, modbus client tools will hide this and do the polling for you invisibly however developers need to know this request-response activity is happening under the covers, especially if the responsiveness SLAs get tight.
For this basic example, we are going to keep it very simple and connect to a single modbus device and loop around reading the same register value over and over. Let’s create the ModbusClientProvider and then the ModbusClientPoller.
package com.stephennimmo.modbus;

import jakarta.enterprise.context.ApplicationScoped;
import jakarta.enterprise.inject.Produces;
import net.solarnetwork.io.modbus.ModbusClient;
import net.solarnetwork.io.modbus.tcp.netty.NettyTcpModbusClientConfig;
import net.solarnetwork.io.modbus.tcp.netty.TcpNettyModbusClient;
import org.eclipse.microprofile.config.inject.ConfigProperty;

@ApplicationScoped
public class ModbusClientProvider {

    @ConfigProperty(name = "modbus.host")
    String modbusHost;

    @ConfigProperty(name = "modbus.port")
    int modbusPort;

    @Produces
    ModbusClient modbusClient() {
        NettyTcpModbusClientConfig config = new NettyTcpModbusClientConfig(modbusHost, modbusPort);
        config.setAutoReconnect(true);
        config.setAutoReconnectDelaySeconds(5);
        ModbusClient client = new TcpNettyModbusClient(config);
        client.start();
        return client;
    }

}
package com.stephennimmo.modbus;
import io.quarkus.logging.Log;
import io.quarkus.runtime.ShutdownEvent;
import io.quarkus.runtime.Startup;
import io.quarkus.runtime.StartupEvent;
import jakarta.enterprise.context.ApplicationScoped;
import jakarta.enterprise.event.Observes;
import jakarta.inject.Inject;
import net.solarnetwork.io.modbus.ModbusClient;
import net.solarnetwork.io.modbus.ModbusMessage;
import net.solarnetwork.io.modbus.netty.msg.RegistersModbusMessage;
import java.util.concurrent.Executors;
import java.util.concurrent.ScheduledExecutorService;
import java.util.concurrent.TimeUnit;
@ApplicationScoped
@Startup
public class ModbusClientPoller {
public static final ScheduledExecutorService executor = Executors.newSingleThreadScheduledExecutor();
@Inject
ModbusClient modbusClient;
void onStartup(@Observes StartupEvent event) {
Log.info("Starting...");
executor.scheduleAtFixedRate(this::read, 5000, 1000, TimeUnit.MILLISECONDS);
}
void read() {
if (!modbusClient.isConnected()) {
Log.errorf("ModbusClient is not connected...");
return;
}
try {
ModbusMessage request = RegistersModbusMessage.readHoldingsRequest(1, 0, 1);
long start = System.currentTimeMillis();
RegistersModbusMessage response = modbusClient.send(request).unwrap(RegistersModbusMessage.class);
Log.infof("Response: %s [%s], executionTime: %s", response, response.dataDecode()[0], System.currentTimeMillis() - start);
} catch (Exception e) {
Log.errorf("Unable to Read: %s", e.getMessage(), e);
}
}
void onShutdown(@Observes ShutdownEvent event) {
Log.info("Shutdown...");
executor.shutdown();
}
}The application logic is fairly simple. We are using a SingleThreadScheduledExecutor for our polling mechanism to startup after 5 seconds and then poll every second. We hardcoded some of the register information in the read method’s RegistersModbusMessage.readHoldingsRequest(1, 0, 1), where the parameters are for the unitId, address of the register, and the number of registers to read starting at that address.
Three items of note:
- The execution of the onStartup method will block the completion of the startup of the application. If you start a while loop or something directly in the method, the method won’t return and the application will wait. That’s part of the reason why we offloaded the polling into a separate thread.
- The ScheduledExecutorService.scheduleAtFixedRate functionality doesn’t play nicely with uncaught or Runtime exceptions. It will run but if an unknown or unexpected exception is thrown in the
Runnableprovided, the scheduler will stop. Make sure to handle those as I did with the catch-all-and-log-it forException. - I put a check in there if the
ModbusClientis connected prior to trying to read from it. This technically isn’t necessary as the catch block will handle the eventual exception thrown by the client, however it generates a warning message with a full stack trace, which is a lot of logging.
The last thing to add is the configuration items for the modbus client. To test locally in Quarkus’ dev mode, I created a new file called application-dev.properties that will contain all my dev-related configurations.
modbus.host=<ip-from-below>
modbus.port=5020
To test the functionality, I am using a couple of opensource tools I found. One allows you to run a modbus server, diagslave, and one allows you to poll or update the values, modpoll. I am running these on a Red Hat Enterprise Linux 9.2 box. Here’s the command for starting the server and for polling. If you are connecting remotely, as I am, you will need to open the port. You may need to add user permissions to allow to connect to TCP as well.
// Run the server
nohup ./diagslave -m tcp -p 5020 &
// Poll the Server
./modpoll -m tcp -p 5020 -a 1 -r 1 -c 1 -1 127.0.0.1
// Write a new value
./modpoll -m tcp -p 5020 -a 1 -r 1 -c 1 -1 127.0.0.1 <val>
After starting the server, I can then startup my application in dev mode using the Quarkus CLI (quarkus dev) and watch it start polling and printing.
Native Image Compilation and Container Building
Now that I have a running application, the next step is to package the application. Remember, we are wanting to target this for the edge so one of my goals is to make not only the container as small as possible, but I also want to use as little cpu and memory as possible. For this, we are going to do native image compilation and then use the quarkus-micro-image as a base image for our container. If you look at the file located in your project at src/main/docker/Dockerfile.native-micro, the comments at the top of the file provide the example commands to accomplish this task. However, I have Podman installed on my Mac so instead of having to go through the effort to install and maintain GraalVM, we can just use podman to do our native build for us.
./mvnw install -Dnative -Dquarkus.native.container-build=true -Dquarkus.native.container-runtime=podmanNow that the native build is created, we can then create our micro container using Podman.
podman build -f src/main/docker/Dockerfile.native-micro -t quarkus/quarkus-modbus-client .And finally, we can run the container using Podman as well. We will need to pass the host and port as environment variables for the container to run.
podman run --name quarkus-modbus-client -it --rm \
  -e MODBUS_HOST=192.168.1.11 \
  -e MODBUS_PORT=5020 \
  quarkus/quarkus-modbus-client
Image Size and Runtime Resources
As previously stated, we want to build for the edge. We want small container images that don’t choke the limited bandwidth when downloading new versions. We also want the application to use as little cpu and memory as possible. With our container now running, let’s take a look at some of the specs.

The image is only 65 MB. Not too bad.
Now let’s look at the running container and it’s resource utilization.
podman stats --no-stream
Only using 5 MB of memory and only a tiny sliver of CPU. Sure our use case is really simple, but it’s clear that the effort around native image compilation and creating a micro container image is worth the effort.
Conclusion
While there are many other concerns in building modbus integration components, this blog post should provide you some ideas on how you might be able to accomplish these tasks using Quarkus. The native image compilation features allow developers to use Java at the edge without the overhead of running the application in a full blown JVM. Building it into a container provides interoperability across different environments and provide better confidence in execution. If you have any questions, feel free to reach out to me on the socials.
GitHub: https://github.com/stephennimmo/quarkus-modbus-client